Shopify Add to Cart & Checkout
Two native Shopify blocks that turn a quiz result into a real cart:
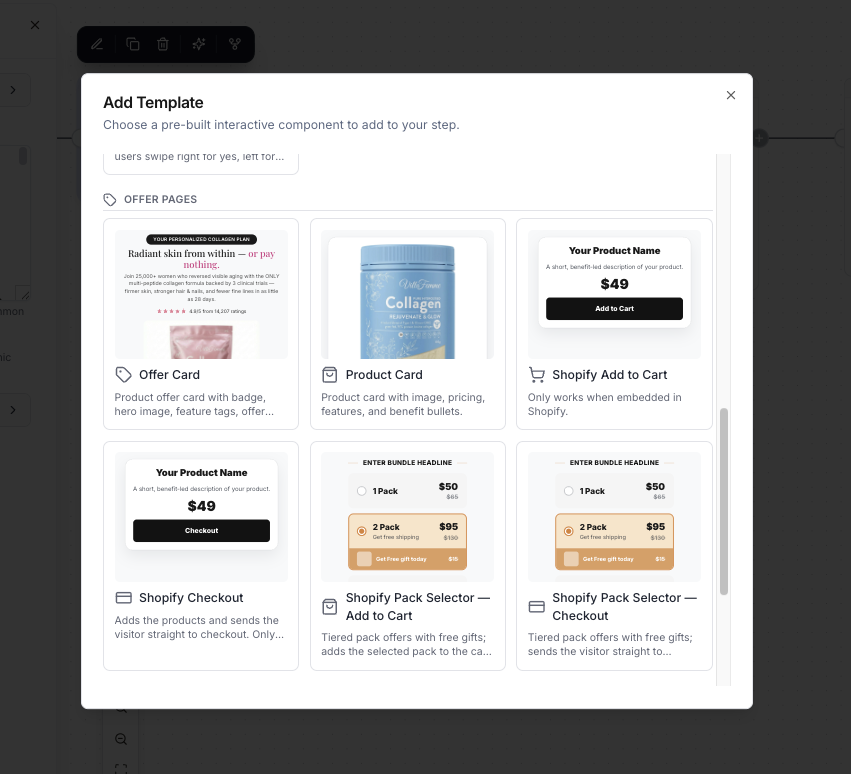
- Shopify Add to Cart — adds the products you configured to the shopper's cart and opens your theme's cart drawer. The shopper stays on the funnel.
- Shopify Checkout — adds the same products, then sends the shopper straight to your Shopify checkout.
They are configured exactly the same way. The only difference is what happens after the click.
Requirements
Before these blocks will do anything, you need:
- The blocks enabled on your account — see below
- A published Clarflow funnel
- The funnel embedded in your Shopify store with a Custom Liquid block — see Embedding in Shopify
- The products published to the Online Store sales channel in Shopify
Getting the blocks enabled
The Shopify blocks are off by default. If you don't see them in the Offer Pages category — or they show a lock — ask the Clarflow team to enable them for your account and they'll appear the next time you open the builder.
Why they only work when embedded
The button inside your funnel does not add to the cart itself. It asks the page it is embedded on to do it, and Clarflow's embed.js — which is running on your storefront — performs the cart request from your own domain, with your shopper's cart session.
That only works on your store. A Clarflow-hosted funnel page (your clarflow.com link or your own custom funnel domain) is a different origin: no store session, no cart, nothing to add to.
What you'll see if the funnel isn't embedded: the button label changes ("Added ✓" / "Redirecting…") and nothing else happens. No error is shown to the visitor. This includes the builder preview and the shared public link — always test on the live storefront page.
Add to Cart vs Checkout
| Shopify Add to Cart | Shopify Checkout | |
|---|---|---|
| Adds products to the cart | Yes | Yes |
| After the click | Opens your theme's cart drawer or popup; visitor stays on the funnel | Redirects to your Shopify checkout |
| Button label after the click | Switches to "Added ✓", then back after ~2 seconds | Switches to "Redirecting…" and stays (the page navigates away) |
| Best for | Mid-funnel offers, bundles the shopper can keep adding to | The final step — one click from quiz result to purchase |
Cart drawer note: Add to Cart opens whichever cart UI your theme uses — a drawer or a popup notification. If your theme's Cart type is set to Page (no drawer, no popup), the item is still added and the cart icon count refreshes, but nothing opens. Use Shopify Checkout if you want a guaranteed next step.
Step 1 — Add the block
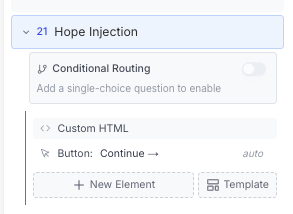
- Open your funnel in the editor and select the step you want the offer on
- In the elements panel, click Template at the bottom of the step
- In the Add Template modal, open the Offer Pages category
- Click Shopify Add to Cart or Shopify Checkout
Step 2 — Design the card
With the block selected, the editor panel gives you:
| Section | Fields |
|---|---|
| Product | Product Image (upload), Product Name, Product Description |
| Pricing | Show original (strikethrough) price, Original Price, Price, Currency Symbol |
| Shopify Products | One or more product rows — see Step 3 |
| Button | Button Text, Background Color, Text Color, Border Color, Border Radius, Border Width |
The price on the card is display-only. Shopify charges whatever the variant actually costs. Keep the two in sync, and if you're advertising a quiz-specific discount, set it up in Shopify (automatic discount or discount code) — typing a lower price on the card does not discount anything.
Step 3 — Connect a Shopify product
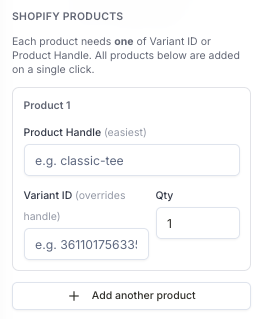
Scroll to Shopify Products. Each row needs one of:
- Product Handle — easiest, and what most people should use
- Variant ID — exact, and required when a product has options (size, colour, subscription)
Plus a Qty (whole number, minimum 1).
If you fill in both, the Variant ID wins.
Finding the product handle
The handle is the slug at the end of the product's storefront URL:
https://yourstore.com/products/classic-tee
                                ^^^^^^^^^^^
                                the handle
You can also read it in Shopify admin: Products → open the product → Search engine listing → Edit → URL handle.
A handle picks a variant for you. Clarflow looks the product up and adds its first available variant. That's fine for single-variant products. If the product has sizes, colours, or a subscription option, use a Variant ID so you know exactly what lands in the cart.
Finding the variant ID
Method A — storefront JSON (works without admin access)
Open this in a browser tab, replacing the handle with yours:
https://yourstore.com/products/classic-tee.json
Look for variants and copy the id of the variant you want. Each entry also shows its title ("Small / Black"), price, and available, so it's the quickest way to grab several IDs at once.
{
  "product": {
    "id": 8123456789012,
    "handle": "classic-tee",
    "variants": [
      { "id": 44987654321098, "title": "Small / Black", "price": "29.00", "available": true },
      { "id": 44987654321099, "title": "Medium / Black", "price": "29.00", "available": true }
    ]
  }
}
Method B — Shopify admin
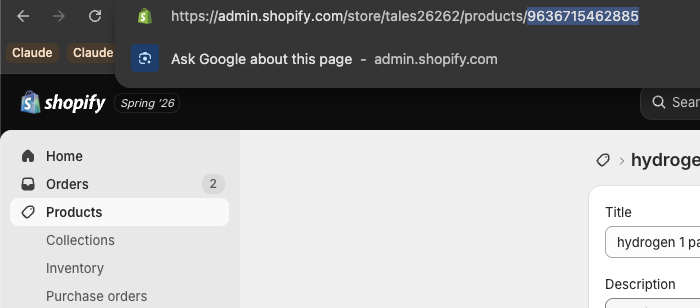
If you have admin access: Products → open the product → Variants → click the variant, then copy the number after /variants/ in the browser URL:
https://admin.shopify.com/store/your-store/products/8123456789012/variants/44987654321098
                                                    ^^^^^^^^^^^^^          ^^^^^^^^^^^^^^
                                                    product ID             variant ID
Paste digits only. If you copy an ID from the Shopify GraphQL API it looks like
gid://shopify/ProductVariant/44987654321098— paste just44987654321098.
Don't use the product ID. Opening a product in Shopify admin shows a number in the URL — but that one identifies the product, not a variant, and the Variant ID field will not accept it. If that's the only number you have, use the Product Handle field instead, or read the real variant ID from the storefront JSON above.
Adding several products in one click
Click Add another product to add another row. Every row is added to the cart in a single request when the button is clicked, so it works for:
- Bundles — "your 3-product routine", added together
- A main product plus a free gift
- An add-on the quiz recommended
Each row has its own quantity. Rows with neither a handle nor a variant ID are skipped silently, so delete any blank rows you don't need.
Selling subscription products
Shopify models subscriptions as selling plans — "Subscribe & save", "Delivered monthly", and so on. A plan is created by your subscription app (Shopify Subscriptions, Recharge, Seal, …) and attached to a product. Adding a product without a plan buys it once; adding it with a plan starts a subscription.
Turn on Subscription on any product row, and that product goes into the cart on its selling plan. The visitor lands in your normal Shopify checkout with a recurring line item.
Letting Clarflow pick the plan (easiest)
Leave Selling Plan ID blank and fill in the Product Handle. On click, Clarflow reads the product from your storefront and uses the first plan available for that variant.
Use this when the product has exactly one subscription plan. If it has several ("monthly" and "every 3 months"), pick the one you want explicitly — otherwise you're relying on Shopify's ordering.
Choosing a specific plan
Open this in a browser tab, replacing the handle with yours:
https://yourstore.com/products/classic-tee.js
Look for selling_plan_groups and copy the id of the plan you want:
{
  "handle": "classic-tee",
  "selling_plan_groups": [
    {
      "name": "Subscribe & save",
      "selling_plans": [
        { "id": 695096639813, "name": "Deliver every month" },
        { "id": 695096639814, "name": "Deliver every 3 months" }
      ]
    }
  ]
}
Paste that number into Selling Plan ID. As with variant IDs, paste digits only — not the gid://shopify/SellingPlan/… form from the GraphQL API.
Note the
.js, not.json. The.jsonURL used for variant IDs above does not include selling plans. Use.jsfor this.
Showing the price as recurring
The card's price is still just text. Two fields under Pricing make it read as a subscription:
- Billing Period Suffix — e.g.
/month, shown right after the price - Subscription Note — e.g. "Delivered every 30 days. Cancel anytime."
As always, the card price is cosmetic — Shopify charges whatever the selling plan says, including its subscription discount. Make sure the two agree.
Mixing subscriptions and one-time products
Subscription is per row, so one click can add a subscription product and a one-time add-on together. Shopify splits them into separate line items automatically.
On the pack selector and bundle grid, the toggle sits on each product row inside a pack or column — so you can offer a one-time pack and a subscribe-and-save pack side by side.
Removing the Continue button
These blocks come with their own button, so Clarflow's default Continue button is usually redundant on the same step.
When the step connects straight to an exit node, Continue is hidden for you automatically — the block's button ends the quiz.
Anywhere else (a mid-funnel offer, or a step that feeds another step) you can remove it yourself:
- In the elements panel, click the auto-managed Button row on the step
- Turn on Hide continue button
Only do this when the block's own button is the way forward — with Continue gone, the Shopify button is the visitor's only way off that step. That's exactly what you want for a Shopify Checkout block, which navigates away. For a Shopify Add to Cart block, which only opens the cart drawer, keep Continue unless the step is meant to be the end of the quiz.
The toggle is step-wide: on an A/B test step it applies to both variants.
Testing it
- Publish the funnel in Clarflow
- Open the live storefront page the funnel is embedded on — not the builder preview, and not the Shopify theme editor preview (its sandbox can block the request)
- Open your browser console (F12) before clicking the button
Every step logs with a [clarflow] prefix, so a working click looks roughly like:
[clarflow] posted clarflow-add-to-cart to parent window
[clarflow] embed.js RECEIVED clarflow-add-to-cart
[clarflow] POST https://yourstore.com/cart/add.js
[clarflow] /cart/add.js status: 200
[clarflow] ADDED to cart
Troubleshooting
Nothing happens when I click
The funnel is almost certainly not embedded, or you're testing on a Clarflow-hosted page. Confirm you're on your yourstore.com URL with the embed code on the page, then check the console for [clarflow] logs. No logs at all means embed.js isn't loading — recheck the embed snippet in your Custom Liquid block.
Console shows "could NOT resolve a variant for handle"
The handle is wrong, or the product isn't available on the Online Store. Open https://yourstore.com/products/<handle>.js directly — if it 404s, the handle is wrong or the product isn't published to the Online Store sales channel.
The wrong variant gets added
A Product Handle always resolves to the product's first available variant. Switch that row to a Variant ID.
The item is added but nothing opens
Your theme has no cart drawer or popup (Cart type = Page). The cart count still updates. Use Shopify Checkout instead if the shopper needs to be moved along.
/cart/add.js returns 422
Shopify rejected the line item — usually sold out, more units requested than are in stock, or a variant ID that doesn't exist in this store. The console logs Shopify's own error message.
It charged once instead of subscribing
The console says which case you hit:
- "…exposes no selling plan to subscribe to" — the product has no subscription plan attached in Shopify, or the plan isn't published to the Online Store sales channel. Fix it in your subscription app.
- "…no Selling Plan ID and no Product Handle to auto-pick one from" — the row has only a variant ID. Either fill in the Product Handle, or set the Selling Plan ID explicitly.
In both cases the product is still added, just as a one-time purchase — better than the shopper hitting a dead button.
If there's no error at all and the checkout still shows a one-time item, the storefront may be running a cached copy of embed.js. Hard-refresh the page (Cmd/Ctrl + Shift + R) and try again.
/cart/add.js returns 422 on a subscription product
Some products are subscription-only (requires_selling_plan) — Shopify refuses to add them without a plan. Turn Subscription on for that row.
The price charged doesn't match the card
Expected — the card price is cosmetic. Shopify always charges the variant price. Set up a discount in Shopify if the quiz promises one.
It works in preview but not on the live site
The funnel isn't published, or the live page is missing the embed code. Republish, then hard-refresh the storefront page (Cmd/Ctrl + Shift + R).
Advanced: hooking into the cart events
On the storefront page, embed.js dispatches two window events you can listen for — handy for firing a pixel or a custom animation:
window.addEventListener('clarflow:add-to-cart:success', function (e) {
  console.log('cart is now', e.detail);
});

window.addEventListener('clarflow:add-to-cart:error', function (e) {
  console.log('add to cart failed', e.detail);
});
Both fire for the Add to Cart and Checkout blocks, since both go through the same cart request.
Related
- Embedding in Shopify — how to get the funnel onto your store in the first place
- Custom HTML JavaScript API — build your own card and call
Clarflow.addToCart()yourself